Tag Archive | GEDmatch Tier 1

Tool to find common ancestors at GEDmatch

Whenever I get a new good-sized DNA match, I try and figure out how we are related. Ancestry and MyHeritage both have clever tools that search your tree and the trees of other users to come up with the likely relationship. Of course both you and your match have to have a family tree connected to your DNA on those sites for that to work.

My father’s DNA matches with matching ancestors, first run

GEDmatch has just released a tool for its Tier 1 (paid) members that will search for the common ancestor you have with your DNA matches on that site. This capability requires both you and your match to have uploaded a GEDCOM to GEDmatch and associated it with your kit. I just updated my 2015 blog post about using GEDCOMs at GEDmatch which explains much about them, so click here to read it. By the way, a GEDCOM is a text file that is formatted especially for genealogy programs; it lets you move the facts in your tree from one genealogy web site or program to another.

The new tool found nothing on my mother’s side. She was German and half Jewish. There are almost no Germans at GEDmatch and my one known half 2nd cousin on there has no tree uploaded. As to the Jewish side, very few have their trees far enough back to meet mine. I need to get a few of my known 3rd cousins to upload GEDCOMs.

The above listing, partially repeated below,  shows all the common ancestors my first run of this tool found for my Norwegian-American father using the default settings on the form. I have cut off the first 3 columns on the left which have the kit number, match name, and email address for privacy; also that makes the image readable on this page!


Let’s look at the rest of the columns for my Dad’s top match. Clicking the tree icon would take you to the user profile information. The cM shared are listed next; 40.3 is match that can be anything from a 4th to an 8th or even more distant cousin. Then the name of the possible shared ancestor, first in my GEDCOM and then in my match’s GEDCOM; either one can be clicked on to go to that person’s tree entry. The 8G is how many steps down from that ancestor my Dad is. If you click that, you see a descendant list from that ancestor in your tree. Notice that his match is also 8 steps down, so in the same generation. Subtract one to get the cousin level so this is a 7th cousin.
Continue reading

Make a combined DNA kit for yourself

Have you ever wanted to make a kit combining all your DNA tests at the different companies so as to get the most SNPs for comparisons? Well GEDmatch provides that for paid members. So of course I made one of these superkits for myself! I combined my LivingDNA with my V3 23andme and my current Ancestry kit. Now to investigate what I have gained from this.

The first thing I did was compare this new kit to my recent Ancestry kit. All looked fine. It has the expected small differences, many of which disappeared (including the black lines) when I checked the prevent hard breaks box on the form. The older 23andme kit comparison had more black spots and mismatches.

My next thought about my new superkit was that I might get a better comparison to cousins who tested more recently at 23andme but none of them have uploaded to GENESIS yet. So I checked how my comparison to an Ancestry tester, my second cousin once removed Jeanie, looked. The superkit gets the same result as my recent Ancestry kit. When I compared her to my 23andme kit and my Living DNA kit however, there were small differences.

Continue reading

New Compact Chromosome Browser on GEDmatch’s GENESIS

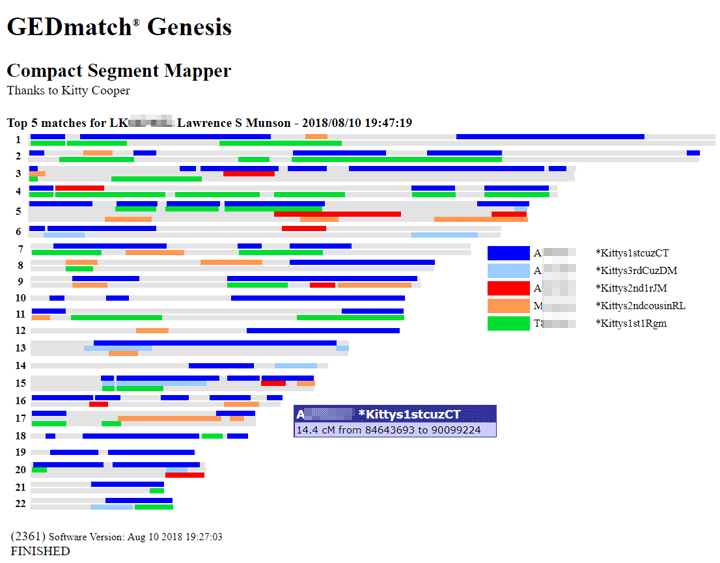
Today GEDmatch launched a version of my segment mapper which is integrated with their database. It can be used as a way to easily visualize multiple matches on GENESIS. This first version shows how everyone compares to the first person on the list, like the current 2D chromosome browser but more compact. Also each color is a person.

My Munson cousins in my new compact segment mapper at Genesis

Above is the screenshot of my Munson cousins which even shows one of the boxes that appears when the cursor is placed on a segment. Click on this image to see a copy of the html version (edited for privacy) where you can put your cursor on any segment to see the details. (N.B. when you put your cursor on a segment and the information pops up via javascript that is called a mouse over in geek speak. )

One way to get a display like this at Genesis is to check the boxes (tier 1 only) next to your best matches in the one-to-many (up to 40 of them) and then click the button “Visualization” at the top of the page. Another way to get there is to use the Tier 1 tool “MultiKit Analysis” and select the kits you want to look at. Remember the first kit listed is the one that all the others will be compared to.

Continue reading

Using GEDmatch tag groups

The multiple kit analysis function works beautifully with tag groups. Another benefit of tag groups, is that when I don’t remember the kit number of a cousin whose results I wish to view, I can look it up quickly by displaying the people in that tag group (from the View/Change your profile (password, email, groups) on the top left)

My previous post about tag groups mentioned that tag groups are a quick way to see where a new match fits in by looking at their one to many page for your tag colors. However this is less useful for a distant cousin match (fewer colored tags) or an iffy paper trail match. In those cases I put the new person in my Unknown group (which only ever has the one person being analyzed) and then compare with all the relatives I expect a match to, by using their tag groups.

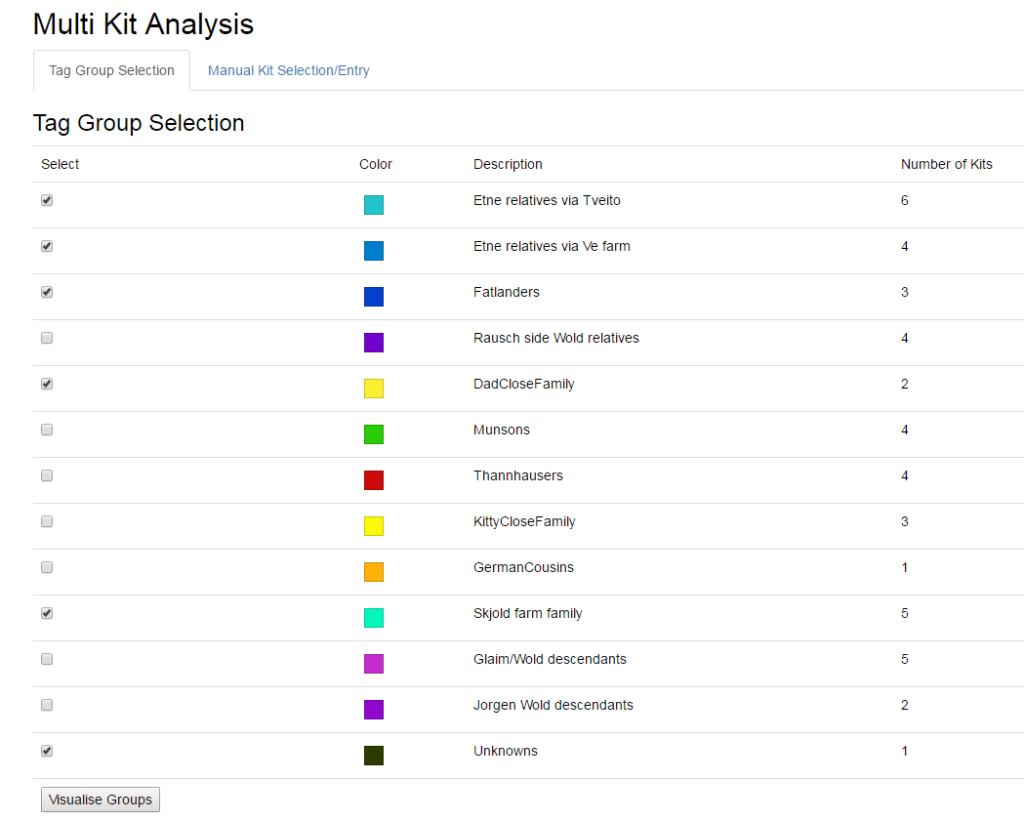
The main GEDmatch page has a box called Analyze Your Data and towards the bottom of that box you can see Multiple Kit Analysis with a big red NEW next to it. The “new” is because you can now use tag groups for this analysis. When you click Multiple Kit Analysis to get to that function, you will see a page like the one shown below. The old way of doing multiple kit analysis, by typing in each one, is still available from the Manual Kit Selection/Entry tab on this page or by checking boxes in various other functions like one-to-many.

My tag groups: note that I am using shades of aqua and blue for my Etne, Hordaland, Norway descended cousins

You can check the tag groups of interest and compare them to the new person (the Unknowns group for me) in all the wonderful ways the multiple kit analysis gives you (Click here for the slides on that from my most recent GEDmatch presentation).

Recently I have been searching for a “Lee Oleson” who is the grandfather of a third cousin match at Ancestry. He was only in town long enough to get my match’s grandmother with child. This third cousin’s one to many lights up with the colors of my Etne, Hordaland, Norway side relatives.  So I set myself a project of tracing forward all the descendants of the eight children of my Etne great-great-grandparents to see if I could find Lee.

Continue reading

Taking it to the Next Level – DNA Spreadsheets

Perhaps this post needs the subtitle , “My Perfect Cousin Goes to GEDmatch.”

Most of us can keep track of information in spreadsheets. So how to do that with DNA? Well, the idea is to keep a list of matching DNA segments so that a new match can be compared to your known family members. That way you may be able to see where they fit in.

If you have tested at 23andme, MyHeritage. or Family Tree DNA, you can download your list of matches with their matching DNA segments either directly from your testing company or by using the tools at DNAgedcom. However AncestryDNA does not provide a list of matching segments.

Extract from my Dad's MasterSpreadsheet

Extract from my Dad’s Master DNA Segment Spreadsheet (click for a larger version)

Why would you want those? The short answer is to figure out which line a new DNA cousin belongs to. For the long answer, read on. For more posts about DNA spreadsheets click here or in the tag cloud, lower right hand column.

tier1smll AncestryDNA testers can make a DNA segment spreadsheet by using any of a number of utilities at the GEDmatch web site. Start by uploading your raw DNA data (click here for that “how to” post). Your results will usually be ready for full comparisons the next day. Then buy the tier 1 utilities for at least one month ($10).

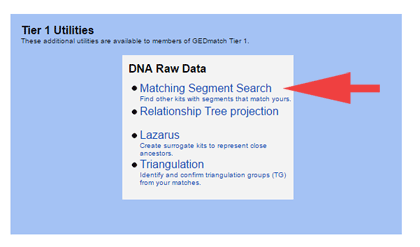
My preference for making a first spreadsheet is to use the Tier 1 GEDmatch Matching Segment Search. Then I go through the top matches from the ‘One-to-many’ matches report with that spreadsheet as a reference. I add notes on what I discover to my new spreadsheet.

Here is the step by step of what I did for my perfect cousin J.M. whose AncestryDNA results I blogged about in my previous post.

Continue reading